How to Sew Leather? Leather Sewing Unleashed
Reading Time: about
Sewing leather isn't like sewing fabric — one wrong needle hole and it's permanent. But with the right setup and technique, you can create incredibly durable seams that outlast anything a sewing machine does on fabric. Here's how to get it right the first time.
Sewing leather requires a heavy-duty sewing machine (or hand-stitching tools), leather-specific needles with a cutting point (not ballpoint), and polyester or nylon thread. Unlike fabric, leather doesn't self-heal from needle holes — every stitch placement must be precise and final.
We cover machine and hand-sewing techniques, the essential tools, and the mistakes that ruin leather projects.
Summary
- 1. What Tools are Necessary for Sewing Leather?
- 2. How to Prepare the Leather for Sewing?
- 3. What are the Different Leather Stitching Techniques?
- 4. Can I Use Sewing Machines on Leather?
- 5. How to Handle Common Issues When Sewing Leather?
- 6. Advanced Techniques for Sewing Leather
- 7. Frequently Asked Questions
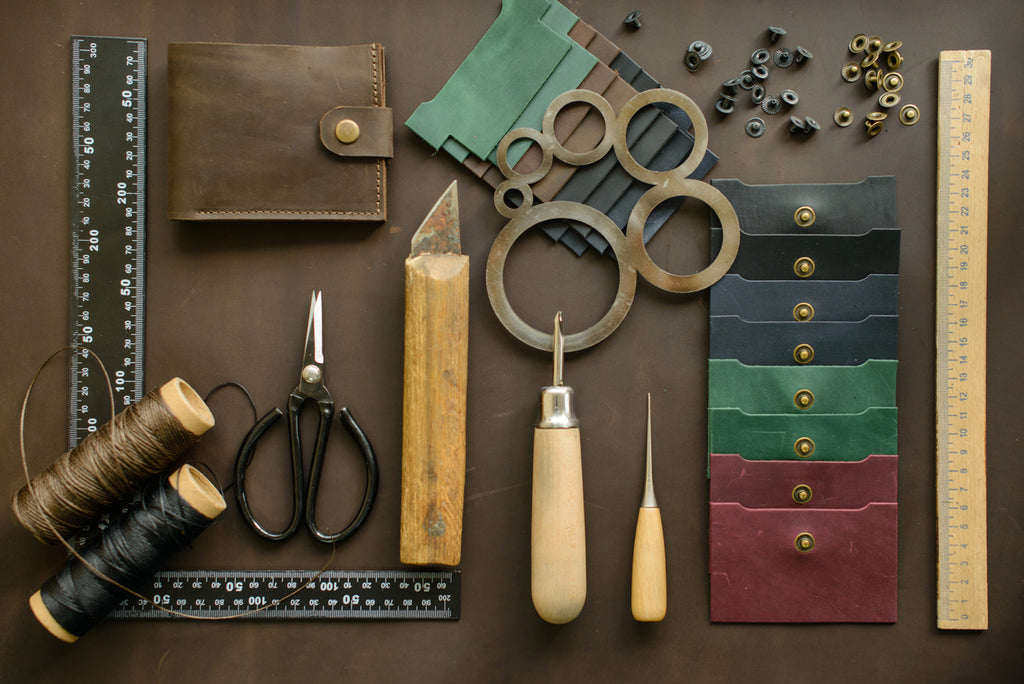
I. What Tools are Necessary for Sewing Leather?
Like any craft, sewing leather requires its unique set of tools. When I began this craft, I quickly realized that picking up the right tools was the difference between a smooth, rewarding project and a frustrating, tiring one. So let's break it down and look at the tools that will become your best friends in this journey.
1. Needles and Thread
In the world of leather sewing, the humble needle and thread take on a whole new level of importance. You might ask, "why is selecting the right needle so crucial?" The answer lies in the nature of leather itself. Unlike fabric, where a needle can pass through the gaps between threads, a needle must create a path through the leather. Choosing the wrong needle can lead to broken needles or damaged leather. My go-to needles are those specifically made for leather, typically sharp, strong, and designed to penetrate without causing unnecessary damage.
Now, what about thread? With leather, your thread must be as sturdy as the material itself. The ideal thread for leather is usually waxed to prevent tangling and to add durability. Nylon or polyester threads are popular choices due to their high strength and resilience against elements such as sunlight and moisture.
2. Thimbles and Finger Protectors
If you've ever tried to push a needle through thick material, you'll know how important it is to protect your hands. When sewing leather, thimbles and finger protectors become essential tools. These little lifesavers can prevent painful pricks and enable you to apply the necessary force to push through the leather without hurting yourself. They come in various materials, from traditional metal to flexible leather or rubber, so you can choose what feels most comfortable for you.
3. Awl, Overstitch Wheel, and Ruler
The awl, overstitch wheel, and ruler may sound like simple tools, but trust me, they are indispensable in leather sewing. An awl is a pointed tool used to mark or punch holes in the leather, preparing it for stitching. It's essential to use an awl correctly as it can determine how easy it will be to sew the leather and how neat the final stitches will look.
The overstitch wheel is another gem that helps to mark the stitch spacing along the leather. Consistent stitch spacing contributes to the overall aesthetic of your leather item and is often a telltale sign of a well-crafted piece.
As for the ruler, I cannot stress its importance enough. Leather is a beautiful, but often expensive material. A mistake in cutting can lead to wasted material or a project that doesn't fit together properly. Using a ruler ensures accurate measurements and straight lines, helping to prevent such mistakes.
4. Leather Punch and Mallet
Last but definitely not least, we have the leather punch and mallet. The leather punch is used to create holes in the leather for stitching. It comes in different sizes to match the thickness of your thread and needle. The mallet, on the other hand, is used to drive the punch through the leather. It's important to use a mallet rather than a metal hammer, as the latter can damage your tools. Proper use of these tools will result in clean, uniform holes that are easy to stitch through and look professional.
Understanding and mastering these tools is your first step in leather sewing. Up next, we'll dive into how to prepare the leather for sewing, so stay tuned!
II. How to Prepare the Leather for Sewing?
Once you've equipped yourself with the right tools, it's time to prepare the leather for sewing. Leather preparation is a process that might seem mundane but let me assure you, it's these steps that set the groundwork for a successful project.
1. Choosing the Right Leather
Just as a chef selects the best ingredients for a dish, so too must we choose the right leather for our project. But what does "right" leather mean? That depends on the project you have in mind. There are various types of leather available, each with their unique characteristics. For example, full-grain leather is highly durable and develops a beautiful patina over time, making it suitable for items like bags and wallets. On the other hand, thinner leathers like lambskin are perfect for clothing due to their soft, pliable nature.
Identifying quality leather can feel overwhelming at first. But here's a tip - look for leather that is supple yet strong, with minimal defects such as scratches or marks. Genuine leather should also have a distinctive smell and feel warm to the touch. Remember, investing in quality leather is just that - an investment in a product that will last for years.
2. Cleaning and Conditioning the Leather
Leather is a natural material and, like our skin, it needs care to look and perform its best. This is where cleaning and conditioning come in. Cleaning your leather before starting your project helps to remove any dust or dirt that could affect your final product. Simple techniques like wiping the leather with a damp cloth often suffice for new leather.
Conditioning is another vital step. A well-conditioned piece of leather is more flexible and easier to sew, making your task much easier. Various products on the market can hydrate and condition your leather, just remember to test on a small patch first to ensure the product doesn't alter the leather's color or texture.
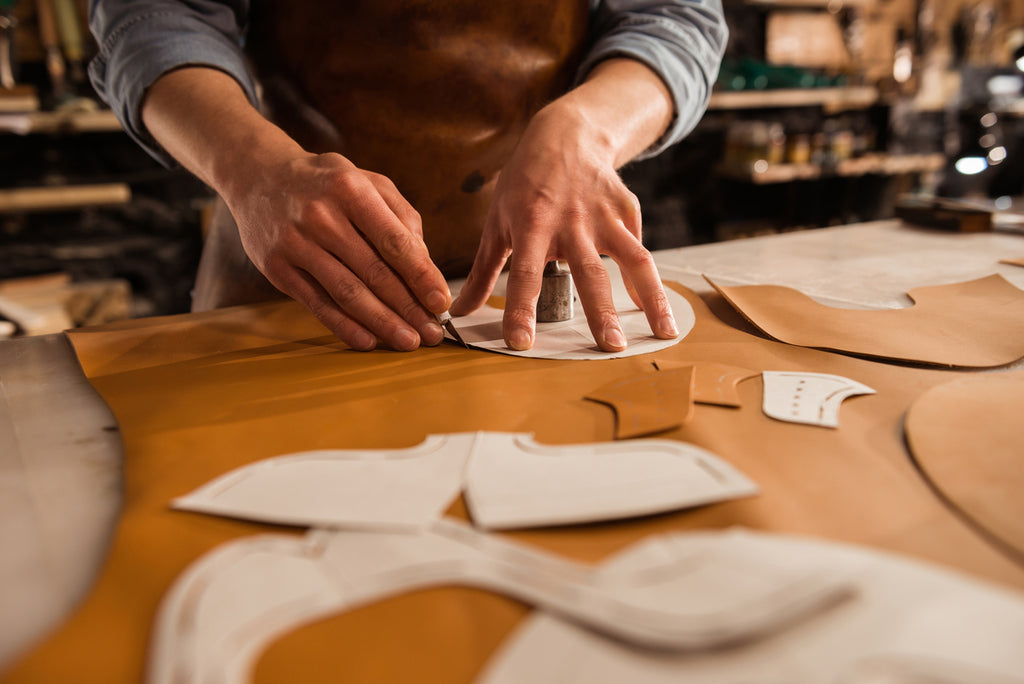
3. Cutting the Leather
Once our leather is clean and conditioned, it's time to cut. Cutting leather might sound straightforward, but it requires precision and care. A mistake here is hard, if not impossible, to rectify. Always use a sharp blade, be it a leather knife or a rotary cutter, and take your time to make sure your cuts are clean and straight.
One common mistake is cutting from the front of the leather. While it might seem intuitive, it's actually better to cut from the back. The back has a rougher texture, allowing for better control and preventing slippage.
Now that you've chosen, cleaned, conditioned, and cut your leather, it's time for the fun part - sewing! Up next, we will look at various stitching techniques, and their uses. So, get your thimbles ready!
III. What are the Different Leather Stitching Techniques?
Now that your leather is prepped and ready, it's time to venture into the heart of leather sewing - stitching. The beauty of leatherwork is that each stitch is an artisan's mark, a testament to the skill and patience that goes into crafting each piece. Let's delve into some of the stitching techniques that are crucial to sewing leather.
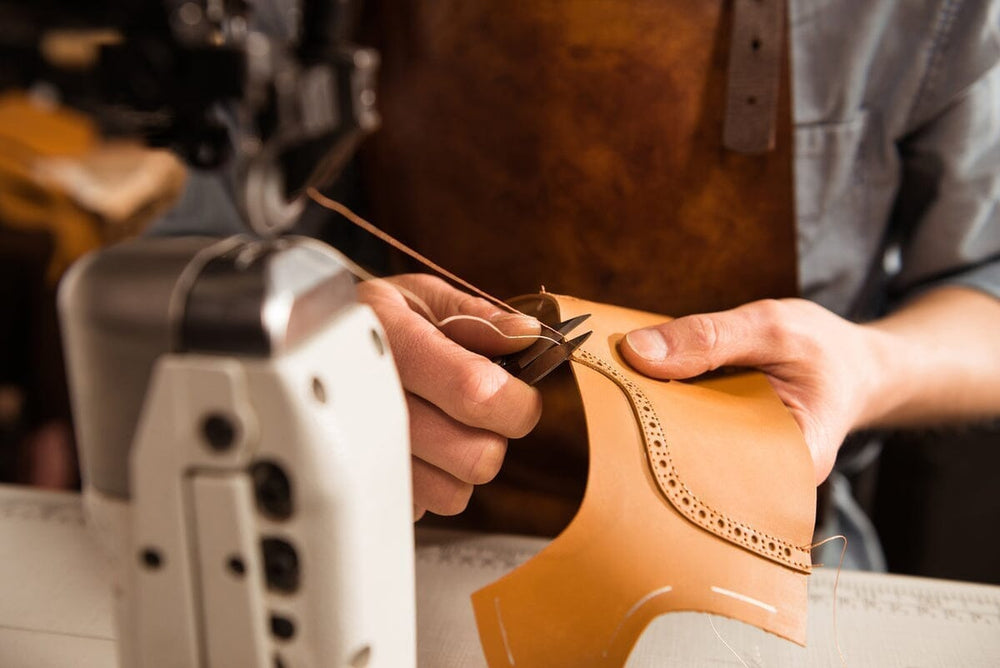
1. Saddle Stitching
Saddle stitching is a popular technique in leatherwork, admired for its durability and aesthetic appeal. The process involves two needles that pass through the same hole creating a thread on both sides of the leather. This technique not only gives a clean, professional finish but also adds strength to your piece. If a stitch were to break, the rest of the stitches would remain intact, unlike machine stitching.
So, when should you use saddle stitching? This technique is ideal for projects that require strength and durability, such as wallets, belts, and bags. It might take a bit more time compared to machine stitching, but the results are well worth the effort.
2. Cross Stitching
Cross stitching is another technique used in leather sewing. It involves creating a series of 'X' shaped stitches along the seam. It might seem intricate, but with a little practice, you'll find the rhythm of this stitch quite enjoyable. The aesthetic appeal of the cross stitch lies in the pattern it creates, giving your project a distinctive look.
Cross stitching is best suited for decorative seams or projects that don't require a high level of strength. It's also a great way to add a unique touch to your items, reflecting your personal style and craftsmanship.
3. Back Stitching
Back stitching is a method commonly used to secure the beginning and end of your stitching line, preventing the stitches from unraveling. It involves creating a couple of stitches forward, then going back one stitch and repeating the process. This results in a continuous line of stitching on the top and a dotted line of stitches on the bottom.
Back stitching is ideal for situations where you want extra reinforcement, such as stress points in bags or areas that will be subject to frequent use. Remember, securing your stitches is as important as the stitches themselves. It's these small details that add to the lifespan of your leather project.
Stitching is indeed the soul of leather sewing. Master these techniques, and you'll have the confidence to tackle any project. But, what happens if you encounter issues during your sewing journey? Stay with me, as we'll discuss how to handle common challenges in the next section.
📷 Credit: Ethan Carter Designs's Youtube Channel
IV. Can I Use Sewing Machines on Leather?
While hand stitching is often associated with leatherwork, sewing machines are also incredibly useful for stitching leather, particularly for larger projects or for those looking to save time. If you're considering using a sewing machine for leather, this section is for you.
1. Choosing the Right Sewing Machine
Before you jump into machine-sewing leather, you need to ensure your sewing machine is up to the task. Sewing leather requires a sturdy machine that can handle the thickness and strength of the material. Look for a machine that has a strong motor and is capable of handling heavy-duty needles. A leather sewing machine should also have a walking foot, which helps feed the leather through the machine smoothly.
There are several machines in the market known for their performance with leather. Some of the top recommendations include the Singer Heavy Duty series and the Janome HD3000. Remember, investing in the right machine can make your leather sewing experience much more enjoyable and efficient.
2. Adjusting Machine Settings for Leather
Sewing leather is not the same as sewing fabric, and your machine settings need to reflect this. A couple of adjustments are essential for a successful sewing experience. First, you'll need to use a leather needle. These needles have a cutting point, which allows them to pierce the leather effectively.
The tension settings and stitch length on your machine will also need adjustment. Leather requires a longer stitch length than fabric, usually around 3-4mm, to prevent perforating the leather too closely, which could lead to tearing. As for tension, it's often a matter of trial and error, but usually, a slightly higher tension than what you would use for fabric works well.
📷 Credit: Skill Tree's Youtube Channel
3. Sewing Leather with a Machine
So, how do you go about sewing leather with a machine? The process is similar to sewing fabric, but with a few tweaks. Start by preparing your machine, installing the leather needle, adjusting the stitch length, and setting the tension. Use a piece of scrap leather to test your settings before you start on your project.
As you sew, let the machine guide the leather rather than forcing it through. Leather is a dense material, and trying to push or pull it can result in crooked stitches or damage to your machine.
One common challenge you might face is the leather sticking to the presser foot. A simple solution is to use a Teflon foot or sticking a piece of clear tape to the bottom of your regular foot.
Remember, patience is key when sewing leather. Take your time, and don't hesitate to make adjustments as needed. Up next, we will look at how to finish your leather projects to give them a professional touch. So, stay with me!
V. How to Handle Common Issues When Sewing Leather?
Sewing leather can be a rewarding experience, but it also has its fair share of challenges. From broken needles to skipped stitches, these common issues can feel daunting, especially for beginners. But fear not, as we'll be exploring these problems and their solutions in this section.
1. Dealing with Broken Needles
Broken needles are a common issue when sewing leather. Why? It's often due to using the wrong type of needle or a dull needle. Leather is a dense material and requires a sharp, sturdy needle to penetrate it cleanly.
So, how do we prevent and handle broken needles? First, always ensure you're using a needle specifically designed for leather. These needles have a triangular point that cuts through the leather rather than piercing it, reducing the chance of breakage. Also, remember to change your needle frequently - a fresh needle for each new project is a good rule of thumb.
If your needle breaks during sewing, stop immediately. Remove all broken pieces from the machine and the leather to prevent any damage. Replace the broken needle with a new one, rethread your machine, and you're good to go.
2. Managing Skipped Stitches
Skipped stitches can be a nuisance, particularly when sewing leather, as every puncture is visible. Skipped stitches are usually a sign of a timing issue between the needle and the bobbin hook. It can also be due to a dull or bent needle.
What's the solution? Firstly, check your needle. Is it the right type for leather? Is it fresh and sharp? If not, replace it. If the issue persists, it might be a timing issue, and it's best to have your machine serviced by a professional.
3. Correcting Uneven Stitches
Uneven stitches can detract from the overall look of your leather project. The usual culprits are inconsistent tension, incorrect stitch length, or issues with feeding the leather through the machine.
To achieve even stitches, start by checking your stitch length. Leather typically requires a longer stitch length than fabric. If your stitches are too close together, they might look uneven and can also weaken the leather.
Next, check your tension settings. Both too tight and too loose tension can result in uneven stitches. Start with the recommended settings for leather in your machine's manual and tweak as necessary.
Finally, ensure your leather is feeding through the machine smoothly. A walking foot can be a great help in this, as it moves the upper layer of leather in sync with the lower layer, preventing any shifting or bunching up.
📷 Credit: Maze Leather's Youtube Channel
What Advanced Techniques Improve Leather Sewing?
Once you've got the basics down, sewing leather becomes a world full of creative possibilities. In this section, we'll delve into some advanced techniques that can take your leather projects to the next level. Whether you're looking to add functional elements like zippers and handles or decorative features like embellishments, these techniques will equip you with the skills you need.
1. Adding Zippers to Leather
Adding a zipper to your leather project can enhance its functionality and aesthetics. But sewing a zipper onto leather can seem daunting. Not to worry! With the right tools and technique, it's completely achievable.
Before you start, ensure you have a strong, good-quality zipper. Metal zippers often work well with leather, providing durability and a stylish look.
To sew the zipper, start by marking where you want the zipper to go. Cut a slit for the zipper, then apply glue along the edges of the slit and on the zipper tape. Position the zipper and press it down into the glue. Let it dry.
Once it's dry, you can start stitching. Use a zipper foot on your sewing machine and sew down each side of the zipper, as close to the zipper teeth as possible. Be slow and patient to ensure your stitches are straight and even.
2. Sewing Leather Handles and Straps
Leather handles and straps can add a practical element to bags and accessories. They need to be sturdy and able to withstand a lot of wear and tear.
The type of leather you choose for your handles or straps matters a lot. Full-grain leather is often a good choice because of its strength and durability.
When sewing handles or straps, cut your leather to the desired length and width, then skive the ends to reduce bulk. Glue and stitch the ends together to create a loop. Reinforce the loop by stitching an "X" or a box shape in the center.
If attaching the handle or strap to a bag or other item, make sure to stitch it on securely. This often involves stitching it onto the item, then reinforcing it with rivets or additional stitching.
3. Creating Leather Embellishments
Leather embellishments can give your projects a unique touch. There are several ways to create embellishments on leather, from simple cut-outs to intricate tooling.
One straightforward method is to create a design on paper, transfer it to the leather, then cut it out with a sharp knife. These cut-outs can be glued or sewn onto your project for a decorative effect.
For a more advanced technique, you could try leather tooling. This involves carving a design into the leather using special tools, then adding color and finish for a truly custom look.
Conclusion
Learning to sew leather is a craft that combines traditional techniques with modern applications. It's a journey that requires patience, attention to detail, and a willingness to experiment.
From understanding the different types of leather and tools to applying advanced techniques, you've now got the foundational knowledge to create stunning leather projects.
Remember, the key to mastering leather sewing lies in continuous practice and exploration.
Frequently Asked Questions
What is the best thread for sewing leather?
When sewing leather, you need a strong, durable thread. Nylon and polyester threads are typically good choices. They're resistant to sunlight and moisture and can handle the strength required to sew leather.
Can you sew leather by hand?
Absolutely! In fact, hand-sewing can give you greater control and precision, especially for intricate projects. Techniques such as saddle stitching are commonly used in hand-sewing leather.
What kind of needle do I need to sew leather?
You need a special leather needle that is designed to cut through leather rather than piercing it like regular needles. These needles are often identified by their triangular tip.
Can a regular sewing machine sew leather?
Yes, but it depends on the thickness and type of leather. Thin, soft leathers can often be sewn on regular sewing machines. However, for thicker leathers, you'll need a heavy-duty or industrial sewing machine designed to handle dense materials.
How do I prevent my stitches from skipping when sewing leather?
Skipped stitches are usually due to a dull or wrong type of needle, or issues with the machine's timing. Ensuring you're using a sharp leather needle, and having your machine serviced regularly, can help prevent this issue.
How do I care for my sewn leather items?
Leather items need regular cleaning and conditioning to keep them looking their best. Use a mild leather cleaner and a quality leather conditioner. Also, avoid storing leather items in direct sunlight or high humidity, as this can damage the leather.
What are the best techniques for sewing leather handles and straps?
Using full-grain leather and ensuring your handles or straps are well-reinforced with strong stitching and rivets will help create durable handles and straps. Techniques such as the saddle stitch are often used for this purpose.
How do I add zippers to leather?
Adding zippers involves marking and cutting a slit for the zipper, gluing the zipper in place, and then sewing it securely with a zipper foot on your sewing machine.
How do I create leather embellishments?
Leather embellishments can be created using techniques such as cut-outs, embossing, or tooling. The method you choose will depend on the look you're going for and your skill level.
What is the best way to store leather items?
Store your leather items in a cool, dry place away from direct sunlight. Use a breathable cover to protect them from dust. Regular conditioning will also help keep them in prime condition.
📫 Related Blog Posts:
📌 How to Clean White Leather? The Ultimate Guide to Pristine Elegance
📌 Cactus Leather: Does it Live Up to the Hype?
📌 What is PU Leather? The Secrets of an Alternative to Real Leather
📌 What is Nappa Leather? A Luxury Real Leather Type
📌 Human Leather | The Secrets of a Controversial Material
📌 How to Stretch Leather Shoes? An Extensive Guide to Comfortable Footwear
📌 How to Get Wrinkles Out of Leather? Bring Your Leather Back to Life
📌 How to Make Fruit Leather? From Fruit to Fabulous
📌 How to Fix Cat Scratches on Leather?

Leave a comment