7 Leather Crafting Secrets From The Pros Unveiled
Reading Time: about
The difference between amateur and professional leatherwork usually comes down to a handful of techniques that nobody teaches beginners. After testing tools and methods for years, here are the ones that actually make the biggest difference.
Leather crafting (leatherwork) encompasses cutting, stitching, tooling, dyeing, and finishing animal hides into functional and decorative items. Mastering seven key techniques — from proper leather casing to edge burnishing — can dramatically improve the quality of any project.
These aren't beginner basics — they're the insider knowledge that turns a decent project into something you'd be proud to sell or gift.
What Are the Basics of Leather Crafting?
It's one of those timeless skills that feels both ancient and modern. If you're like me, you've probably been captivated by the sheer beauty and durability of leather goods. But where does one start? Let's dive right in!
1. Types of Leather and Their Characteristics in Crafting
Navigating the world of leather types can be a bit like finding your way through a maze. Each type has its own unique characteristics, making it suitable for specific crafting projects. But how do you know which one to choose for your next masterpiece? Let's delve deeper into the intricacies of leather types and their crafting implications.
-
Vegetable-tanned leather: Often hailed as the craftsman's favorite, vegetable-tanned leather is known for its ability to absorb dye and its natural aging process. It starts off as a pale beige and darkens over time, developing a rich patina. This leather is ideal for projects where you want a personalized touch, like belts, wallets, and tooling works. Its rigidity, however, can make it less suitable for clothing.
-
Chrome-tanned leather: Soft, flexible, and available in a myriad of colors, chrome-tanned leather is the go-to for fashion items. Think jackets, handbags, and shoes. Its pliability makes it easier to work with, especially for beginners. However, it's less receptive to tooling and might not age as gracefully as its vegetable-tanned counterpart.
-
Full-grain leather: The crème de la crème of leather. It's the outermost layer of the hide, showcasing all its natural imperfections and grains. This leather is incredibly durable and is often used for high-end products. Its thickness can be a challenge to work with, but the end result? Absolutely worth it.
-
Top-grain leather: A more refined version of full-grain, top-grain leather has its surface sanded to remove blemishes. It's more pliable, making it a popular choice for luxury goods. However, this sanding process also removes some of its natural durability.

Choosing the Right Leather for Your Project:
-
Purpose: Always start by considering the purpose of your project. For a rugged, outdoorsy belt, vegetable-tanned leather is your best bet. Crafting a stylish handbag? Chrome-tanned leather might be the way to go.
-
Skill Level: If you're a beginner, starting with a more forgiving leather like chrome-tanned can be beneficial. As you gain confidence, you can venture into the world of full-grain and vegetable-tanned leathers.
-
Budget: Full-grain leather, with its premium quality, comes with a heftier price tag. If you're crafting on a budget, top-grain or even bonded leather might be more feasible.
There's no "one-size-fits-all" in leather crafting. Each leather type brings its own charm and challenges to the table. The key is to understand their characteristics and align them with your crafting goals. And remember, every leather piece, regardless of its type, holds the potential to be transformed into something beautiful. It's all in the hands of the craftsman!
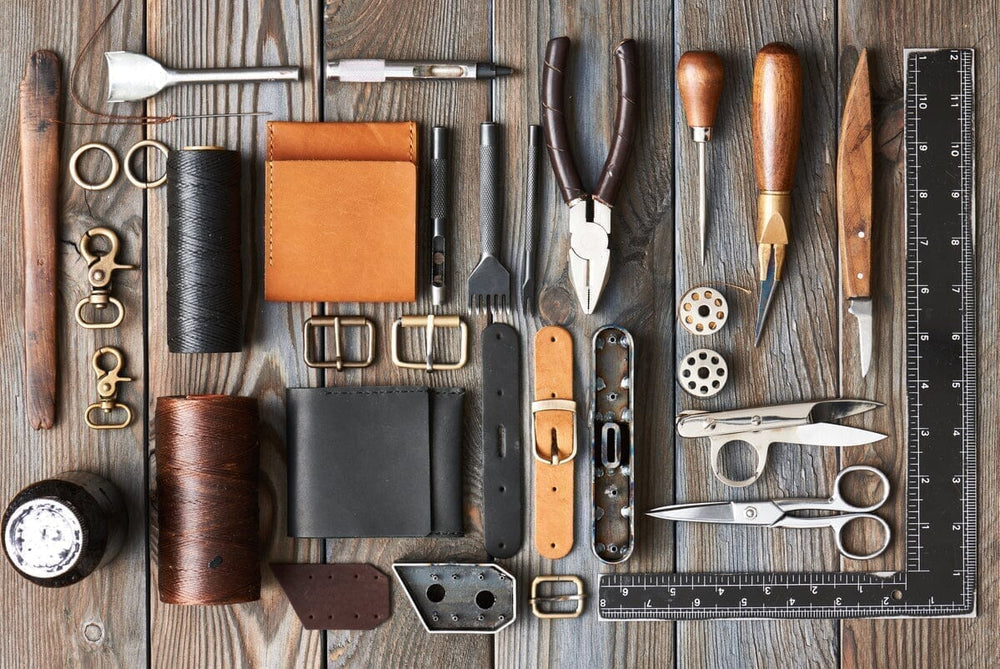
2. Essential tools for every leather craftsman
Alright, let's talk tools. Just like a chef needs their knives, a leather craftsman needs their tools. Here's what I believe every budding leatherworker should have in their arsenal:
-
Swivel knife: This is your bread and butter. It's used for carving and adding details to your designs.
-
Pricking irons: These bad boys help you punch those neat stitching holes. Trust me, your fingers will thank you.
-
Mallet or maul: Used to hammer tools into the leather. And no, your regular hammer won't do. I learned that the hard way.
-
Edge beveler: Want those smooth, rounded edges? This tool's got you covered.
-
Burnishers: Ah, the magic wand for that polished look. Remember, it's all about the finishing touches.
I once met an old craftsman who said, "Your tools are an extension of you. Treat them well." Wise words, indeed.
📷 Credit: Whit + Park's Youtube Channel
3. Setting up your leather crafting workspace
Setting up a workspace is like setting up a mini sanctuary. It's where the magic happens. Here's how I set up mine:
-
Workbench: Invest in a sturdy one. You'll be hammering, cutting, and doing all sorts of things. It needs to withstand the pressure.
-
Lighting: Good lighting is crucial. You don't want to strain your eyes or, worse, make a wrong cut.
-
Storage: Organize your tools and materials. Drawers, pegboards, and bins are your friends. Remember the time I lost my favorite swivel knife? Took me days to find it in the chaos.
-
Ventilation: Some processes, like dyeing, can be smelly. Ensure there's good airflow.
A friend once joked that my workspace looked like a mad scientist's lab. But hey, creativity can be messy, right?
Leather crafting is a journey. It's filled with trials, errors, and aha moments. But with the right knowledge, tools, and space, it can be one of the most rewarding experiences. So, roll up those sleeves and dive into the world of leather. And remember, every piece you create tells a story. Make it a good one!
📷 Credit: Ira Pelletier's Youtube Channel
How Do You Cut Leather Like a Pro?
It sounds simple, right? But let me tell you, it's an art form in itself. I remember my first time trying to cut a piece of leather - let's just say it looked more like a map of a fantasy world than a straight line. But hey, we all start somewhere! Let's dive into the nitty-gritty of cutting leather like a pro.
1. Techniques for precise cutting
Cutting leather isn't just about having a sharp blade; it's about technique, patience, and a little bit of flair. Here's how I mastered the art:
-
Use a steel ruler: This is your best friend for straight cuts. Hold it firmly against the leather and run your blade alongside it. It ensures a straight line every time.
-
Rotary cutters: These are fantastic for curves. They glide smoothly, giving you that perfect arc or circle. Remember the time I tried cutting a curve with scissors? Yikes!
-
Always cut from the inside out: This means starting your cut from the center of the leather piece and moving outwards. It gives you more control and reduces the chances of over-cutting.
-
Practice on scrap leather: Before you dive into your main project, always practice on some scrap pieces. It helps you get a feel for the leather and your tools.
2. Avoiding common cutting mistakes
We've all been there - making a wrong cut and then staring at the leather in disbelief. Here are some common mistakes and how to avoid them:
-
Not marking before cutting: Always use a pencil or a chalk to mark your leather before making that cut. It acts as a guide and reduces the chances of going off track.
-
Using a blunt blade: This is a big no-no. A blunt blade can tear the leather, leaving you with jagged edges. Always ensure your blade is sharp.
-
Rushing the process: Leather crafting is a labor of love. Take your time. If you rush, you're more likely to make mistakes.
-
Not securing the leather: Always ensure your leather piece is secure before cutting. Use clamps or weights to hold it in place. It prevents the leather from moving and gives you a cleaner cut.
3. Caring for your cutting tools
Your cutting tools are like your babies. Look after them, and they'll look after you. Here's how I care for mine:
-
Regular sharpening: I can't stress this enough. A sharp blade is essential for clean cuts. Use a sharpening stone or a strop to keep your blades in top condition.
-
Clean after every use: Leather can leave residues on your tools. Always clean them after use to ensure they remain in top condition.
-
Store them properly: Don't just throw your tools in a drawer. Store them in a tool roll or a dedicated box. It protects them from damage and ensures they're always ready for use.
-
Oil them occasionally: Just like leather, metal tools can dry out. A little bit of oil can go a long way in keeping them in pristine condition.
In the world of leather crafting, cutting is like laying the foundation of a house. Get it right, and everything else falls into place. So, take your time, practice, and before you know it, you'll be cutting leather like a seasoned pro. And remember, every mistake is a learning opportunity.
📷 Credit: Weaver Leather Supply's Youtube Channel
What Stitching Techniques Work Best for Leather?
It's like the secret sauce that holds the world of leather crafting together. I often joke that stitching is like the rhythm in music – it might be in the background, but boy, does it make a difference! Whether you're crafting a rugged leather satchel or a delicate wallet, stitching is where the magic truly happens. Let's unravel this thread, shall we?
1. Hand-stitching vs. machine stitching
The age-old debate: hand-stitching or machine stitching? Both have their merits, and I've dabbled in both. Here's the lowdown:
-
Hand-stitching: There's something therapeutic about hand-stitching. It's slow, methodical, and gives you unparalleled control. The result? Strong, durable stitches that scream craftsmanship. Plus, there's that personal touch. Remember the leather tote I hand-stitched for my sister's birthday? She still raves about it!
-
Machine stitching: Speed and consistency are the game here. If you're looking to produce in bulk or want that sleek, uniform look, machines are your best bet. But, and it's a big but, they can't replicate the charm of hand-stitching. It's like comparing a printed letter to a handwritten note.
2. Best threads and needles for leather
Choosing the right thread and needle can make or break your leather project. It's like choosing the right wine for a meal. Here's what I've learned over the years:
-
Threads:
- Waxed linen thread: This is my go-to. It's strong, durable, and the wax gives it a smooth glide through leather.
- Nylon thread: Great for machine stitching. It's resilient and comes in a variety of colors.
- Polyester thread: Another solid choice, especially if you're looking for UV resistance.
-
Needles:
- Harness needles: These are blunt and perfect for hand-stitching. They reduce the risk of piercing the thread.
- Curved needles: Ideal for those tricky spots. They take a bit of getting used to, but they're a lifesaver in tight corners.
3. Stitching patterns and their applications
Stitching isn't just about joining two pieces of leather. It's an art form. Different patterns can give your project a unique look and feel. Here are some of my favorites:
-
Saddle stitch: This is the classic. Two needles, one thread, and a whole lot of awesomeness. It's strong and gives a rustic look.
-
Cross-stitch: Want to add some flair? Go for a cross-stitch. It's decorative and perfect for projects where you want the stitching to stand out.
-
Whipstitch: This one's great for edges. It wraps around the edge of the leather, giving a neat finish.
-
Blanket stitch: Another decorative stitch, it's often used on the edges of softer leather goods, like pouches or wallets.
Stitching is like the heartbeat of leather crafting. It's where functionality meets art. Whether you're hand-stitching a bespoke piece or using a machine for a bulk order, remember to enjoy the process. Each stitch tells a story, and each project is a testament to your passion and skill. So, thread that needle and let's craft some stories!
📷 Credit: Maze Leather's Youtube Channel
How Do You Burnish Leather Edges for a Professional Finish?
Burnishing leather. Sounds fancy, right? But trust me, once you get the hang of it, it's like that secret handshake only the pros know. I remember the first time I stumbled upon burnishing. I was working on a belt, and the edges just looked... well, unfinished. Enter burnishing, and voila! The belt transformed from "meh" to "wow!" Let's dive into this transformative technique.
1. What is burnishing and why it's essential
Burnishing is the art of smoothing and polishing the edges of leather to give it a finished, professional look. Think of it as the cherry on top of your leather sundae. Here's why it's a game-changer:
-
Aesthetics: Burnished edges give leather goods a polished, high-end look. It's like ironing a shirt; it just looks better.
-
Protection: Burnishing seals the fibers on the edge, protecting them from wear and tear. It's like giving your leather a mini shield.
-
Comfort: Ever had a leather strap chafe against your skin? Burnished edges are smoother and more comfortable against the skin.
2. Tools and materials for effective burnishing
Burnishing might sound complex, but with the right tools, it's a breeze. Here's what's in my burnishing toolkit:
-
Bone folders: These are smooth, bone-like tools (hence the name) that are perfect for rubbing the edges of the leather. They're my go-to for most projects.
-
Wooden slickers: These are rounded wooden tools that fit into a drill. They're great for burnishing larger projects or when you want a super smooth finish.
-
Edge bevelers: Before you burnish, you'll want to round off the edges of the leather. That's where edge bevelers come in. They trim the edges, making them easier to burnish.
-
Water and saddle soap: A little moisture helps in the burnishing process. Some folks use water, while others swear by saddle soap. Both work wonders.
📷 Credit: Rose Anvil's Youtube Channel
3. Step-by-step guide to achieving the perfect burnish
Ready to give your leather that pro touch? Here's how I do it:
-
Prep the edge: Start by using the edge beveler to trim the edges. It makes the burnishing process smoother.
-
Moisten the edge: Dampen the edge with a little water or saddle soap. Not too much, just a smidge.
-
Burnish: Using the bone folder or wooden slicker, rub the edge vigorously. The friction causes the fibers to meld together, giving you that smooth finish.
-
Repeat: Depending on the leather and the look you're going for, you might need to repeat the process a couple of times.
-
Seal the deal: Once you're happy with the burnish, seal the edge with a leather finish. It protects the burnish and gives it a nice shine.
Burnishing is like that final touch-up before you step out for a night on the town. It takes your leather goods from "made at home" to "made by a pro." And the best part? With a little practice, anyone can master it. Here's a great guide on how to burnish leather. So, grab your tools, and let's give your leather the finish it deserves!

What Are the Best Leather Dyeing and Finishing Techniques?
Dyeing leather is like painting a canvas. It's where you get to infuse your personality and style into your creation. I still remember the first time I dyed a piece of leather. It was a wallet, and I was going for a deep, rich brown.
Did it turn out as planned? Nope. It was a patchy mess. But hey, that's how we learn, right? Over the years, I've picked up a trick or two, and I'm here to spill the beans. Let's dive into the colorful world of leather dyeing and finishing.
1. Preparing leather for dyeing
Preparation is key. You wouldn't paint a wall without priming it first, right? The same goes for leather. Here's how I prep my leather for dyeing:
-
Clean the leather: Start by cleaning the leather with a leather cleaner or a damp cloth. It removes any dirt, oils, or residues that might interfere with the dye.
-
Deglaze: If you're working with a piece of leather that's already been treated, you'll need to deglaze it. It removes any finishes or coatings and ensures the dye adheres properly.
-
Wet the leather: Yep, you read that right. Dampening the leather helps the dye spread evenly. Just a light spritz with water will do.
2. Choosing the right dyes and finishes
The world of leather dyes is vast and colorful. But not all dyes are created equal. Here's what I've learned:
-
Water-based dyes: These are my go-to. They're eco-friendly, easy to work with, and come in a wide range of colors. Plus, they don't have that strong chemical smell.
-
Oil-based dyes: These give a deeper, richer color and are perfect for projects where you want a more antique look.
-
Finishes: Once you've dyed your leather, you'll want to seal it with a finish. It protects the dye and gives the leather a nice sheen. There are matte finishes, glossy finishes, and everything in between. Choose one that complements your project.
3. Techniques for an even and lasting finish
Dyeing leather is as much about technique as it is about the dye itself. Here's how I ensure an even and lasting finish:
-
Use a dauber or sponge: These tools help spread the dye evenly. Dip it into the dye, then apply it to the leather in circular motions.
-
Apply in thin coats: It's tempting to slather on the dye, but trust me, less is more. Apply thin coats and let each one dry before applying the next.
-
Buff between coats: Once a coat is dry, buff the leather with a clean cloth. It removes any excess dye and helps the next coat adhere better.
-
Seal the deal: Once you're happy with the color, seal the leather with a finish. It locks in the dye and gives the leather a protective coating.
Dyeing leather is like adding a splash of color to your world. It's where you get to experiment, play, and truly make a piece your own. And with the right techniques, you can achieve a finish that looks professional and lasts a lifetime. So, grab your dyes, roll up those sleeves, and let's add some color to the world of leather crafting!
📷 Credit: Weaver Leather Supply's Youtube Channel
What Advanced Techniques Take Leather Crafting to the Next Level?
Alright, my fellow leather enthusiasts, it's time to level up! Once you've got the basics down, the world of leather crafting opens up in all its intricate glory. I remember the first time I tried an advanced technique – it was a floral pattern on a satchel. Did it turn out perfect? Not quite. But the thrill of pushing boundaries was exhilarating. Ready to dive deep? Let's explore the advanced realm of leather crafting.
1. Creating intricate patterns and designs
Crafting patterns on leather is like giving it a tattoo. It's a mark of identity, style, and flair. Here's how I go about it:
-
Swivel knife magic: This tool is a game-changer. It allows you to carve intricate designs with precision. From floral motifs to geometric patterns, the swivel knife is your canvas brush.
-
Stamping: Leather stamps are like the cookie cutters of the crafting world. They come in various shapes and designs, allowing you to imprint patterns onto the leather. A little tip? Dampen the leather slightly before stamping; it gives a crisper impression.
-
Tooling: This is the art of shaping and molding leather. With the right tools, you can create raised designs that add depth and texture to your projects.
2. Working with exotic leathers
Beyond the realm of regular cowhide lies a world of exotic leathers. Think alligator, ostrich, and even snake. Working with these leathers is like dancing to a different rhythm. Here's what I've learned:
-
Understand the texture: Exotic leathers come with unique textures. Whether it's the bumpy surface of ostrich or the sleekness of snake, it's essential to understand these textures to work with them effectively.
-
Specialized tools: Some exotic leathers are tougher or more delicate than regular leather. Ensure you have the right tools that won't damage the hide.
-
Ethical sourcing: This is crucial. Always ensure that your exotic leathers are ethically sourced and comply with international regulations.
3. Tips for crafting durable leather goods
Craftsmanship is not just about beauty; it's about durability. Here's how I ensure my leather goods stand the test of time:
-
Quality over everything: Always start with high-quality leather. It's the foundation of your craft, and no amount of technique can compensate for poor-quality leather.
-
Reinforce stress points: Areas like corners, straps, and closures undergo the most stress. Reinforce them with double stitching or rivets.
-
Condition regularly: Think of leather as skin. Just as we moisturize our skin to keep it supple, leather needs regular conditioning to maintain its durability and luster.
-
Store with care: Always store leather goods in a cool, dry place away from direct sunlight. It prevents fading, cracking, and other wear and tear.
Advanced leather crafting is like diving into the deep end of the pool. It's challenging, exhilarating, and oh-so-rewarding. With the right techniques, tools, and a dash of creativity, you can craft leather goods that are not only beautiful but also durable and unique. So, gear up, trust the process, and let your imagination run wild in the world of advanced leather crafting!
📷 Credit: Dark Horse Workshop's Youtube Channel
How Do You Care for Your Leather Creations?
As any seasoned leather enthusiast will tell you, the journey doesn't end once the item is made. It's like nurturing a plant; you've got to care for it to ensure it thrives. I've seen many a gorgeous leather piece lose its charm due to neglect. But fear not! With a little love and care, your leather creations can age like fine wine. Let's delve into the world of leather care.
1. Cleaning and maintaining leather goods
Leather, being a natural material, needs some TLC to keep it looking its best. Here's my tried-and-tested routine:
-
Regular dusting: Use a soft cloth to wipe away dust and dirt. It's a simple step, but it goes a long way in keeping your leather looking fresh.
-
Gentle cleaning: For those occasional spills and stains, use a damp cloth and a mild leather cleaner. Remember to test any cleaner on a small, inconspicuous area first.
-
Conditioning: Think of this as moisturizing your leather. A good leather conditioner keeps the leather supple and prevents it from drying out and cracking. But be wary of over-conditioning; too much can make the leather too soft.
-
Protect against the elements: If you're taking your leather out in rain or snow, consider using a leather protector. It forms a protective barrier against moisture and other elements.
2. Storing leather products to ensure longevity
Storage can make or break your leather goods. Here's how I ensure my creations stay in top shape:
-
Avoid direct sunlight: Sunlight can fade and dry out leather. Always store your leather items in a cool, shaded place.
-
Maintain shape: Use bubble wrap, tissue paper, or soft cloth to stuff bags and shoes. It helps them retain their shape.
-
Hang with care: For leather jackets or vests, always use padded hangers. It prevents the leather from stretching or deforming.
-
Avoid plastic: Never store leather in plastic bags. Leather needs to breathe. Instead, use cloth bags or pillowcases.
3. Repairing and restoring worn-out leather items
Leather, like all things, can show signs of wear and tear. But with a little magic, you can breathe new life into old pieces:
-
Scratches and scuffs: Gently rub the area with a leather conditioner or cream. Most minor scratches will blend right in.
-
Tears and holes: These might need professional intervention. But for small tears, a leather repair kit can work wonders.
-
Fading: Restore the color with a leather dye or cream. Remember to clean and prep the leather first.
-
Stretched out items: Wet the leather slightly and reshape it. Let it dry naturally, away from direct heat.
Caring for leather is like nurturing a relationship. It requires patience, love, and a touch of expertise. But the rewards? Oh, they're worth it! With the right care, your leather creations can last a lifetime, telling tales of adventures and memories along the way.
📷 Credit: Corter Leather's Youtube Channel
Conclusion
In the realm of crafting, leather stands timeless, bridging the gap between tradition and innovation.
As we've journeyed through its intricacies, from the types of hides to the art of burnishing, one thing remains clear: leather crafting is not just a skill, but a passion. It's where artistry meets function, and raw hides transform into tales of craftsmanship.
So, as you venture forth, may your hands craft stories, and your creations echo the timeless allure of leather.
FAQs
What's the ideal type of leather for those just starting out?
Vegetable-tanned leather is a popular choice for beginners due to its forgiving nature and multifaceted applications. It's relatively easy to work with, offering a suitable canvas for various techniques and finishes.
How can i achieve precise and uniform stitches?
To ensure your stitches are consistently straight and even, consider using specialized leather-crafting tools like a stitching pony for stability and pricking irons for pre-marked stitch holes. These tools can significantly improve the quality of your stitching.
What differentiates leather burnishing from polishing?
Burnishing is the process of smoothing out the edges of the leather to create a polished, finished look. On the other hand, polishing refers to applying a product or using a technique to give the leather surface a glossy, reflective finish.
What is the recommended frequency for cleaning and conditioning leather goods?
The frequency for cleaning and conditioning varies based on how often the item is used. As a general guideline, aim to clean and condition your leather products every 3-6 months to maintain their longevity and luster.
Can i dye my leather after applying a sealant?
For optimal dye absorption and color vibrancy, it's advisable to dye the leather prior to applying any kind of sealant. Sealants can inhibit the leather's ability to absorb dye properly.
What safety measures should i implement when working with leather?
When crafting with leather, safety is paramount. Always use sharp tools for cleaner cuts, wear protective gloves to guard against accidental injuries, and ensure that you're working in an area with adequate ventilation to minimize exposure to fumes or dust.
How can i prevent my leather goods from developing cracks?
Consistent conditioning and shielding the leather from direct sunlight can go a long way in preventing cracks. The natural oils in conditioners help maintain the leather's flexibility and health.
Is stain removal possible on leather?
The effectiveness of stain removal largely depends on the nature of the stain. Various specialized cleaning agents are available for different types of stains. Always test on an inconspicuous area first.
What is the drying time for dyed leather?
The drying time for dyed leather varies based on the type of dye used and the thickness of the leather. It generally ranges from a few hours up to a couple of days. Always refer to the manufacturer's guidelines for best results.
Can leather items be made waterproof?
Absolutely, there are a range of products designed specifically to provide a waterproof barrier for leather items. Follow the manufacturer's instructions carefully to ensure effective application
📫 Related Blog Posts:
📌 How to Get Smell Out of Leather? Say Goodbye to Leather Odors
📌 How to Darken Leather? From Faded to Fabulous
📌 How to Paint Leather? Master the Art of Leather Painting
📌 What are Aniline Leather & Semi-Aniline Leather?
📌 What is Vegetable Tanned Leather? History, Process, and Comparison
📌 How to Clean Mold Off Leather? [Step-by-Step Guide]
📌 Are Leather Jackets in Style? Fashion Staple or Fading Trend?
📌 How To Emboss Leather? Master the Art of Leather Embossing
📌 How to Fix Cat Scratches on Leather?
📌 Leather Lifesaver: How to Fix Cracked Leather Like a Pro!
📌 How to Stiffen Leather Like a Pro? From Supple to Sturdy

1 comment
Bonjour. Merci pour cette quantité d’articles qui m’a tout appris sur le cuir. J’écris un roman et je voulais parler de ces anciens métiers peu ou pas connus. Cordialement
Leave a comment